The Doom of Eastbourne - Averted!
by Jorit Wintjes
Introduction.
On October 7, the Conflict Simulation Group (CSG) facilitated an online Kriegsspiel hosted by the Georgetown University Wargaming Society; the facilitators used the CSG’s version of the Meckel rules; see Conflict Simulation in the Classroom for more information. A team of Würzburg students (Red Team - British) was pitted against a transatlantic team (Blue Team - French), and after a rather eventful battle, the British won, though both sides showed admirable determiantion even in the face of quite serious setbacks. Below is a short write-up of the battle.
The facilitators used a a British Ordnance Survey 25in to a mile series map of Eastbourne, an online version of which can be found here (with a powerful zoom function; click on “seamless zoomable overlay layer”):
https://maps.nls.uk/os/25inch-england-and-wales/
The topography mentioned below always refers to the map above.
The general scenario.
The scenario is based on late 19th c. British invasion novel literature and assumes that a colonial crisis between the United Kingdom and France has escalated to the point where the French government decides to launch an invasion. Due to a combination of luck and lack of preparation on the British side, French forces manage to neutralize the British Channel Squadron on June 5, 1883. The next day French forces capture Brighton, where during the following days elements of two army corps are embarked. On June 11, the French take Lewes and Newhaven, the latter being particularly important as it is the only harbour where the disembarkation of heavy equipment is possible.
British resistance is stiffening in the following days, and Royal Navy units managed to establish a temporary base for torpedo boats in Eastbourne, launching several daring raids against French shipping bound for Brighton, sinking several supply vessels. As a result of British activities, French forces have pushed further eastwards, and with British forces in the area too disorganised they managed to capture the heights to the West of Eastbourne on D+10 and reached the Eastbourne-Polegate railway. British forces had to withdraw from Polegate on D+11, leaving Eastbourne all but encircled.
On June, 18, 1883, the French hold a line from St Andrew’s School to Boston House, Temple Grove and into Upperton. They have prepared positions for heavy artillery near St Andrew’s School. In order to guarantee the continuing supply of the invasion army a reinforced brigade has been tasked with taking Eastbourne as soon as possible thus denying the enemy this important staging area for raids by torpedo boats. Should the attack fail, holding the artillery positions is important as then heavy artillery can cover Eastbourne Pier, where the torpedo boats are moored.
The British mission is equally simple. During the night the Royal Navy managed to bring three battalions of Australian volunteer infantry into the city; together with the naval brigade already in Eastbourne they are to attack enemy positions, capture Upperton and decisively defeat the enemy.

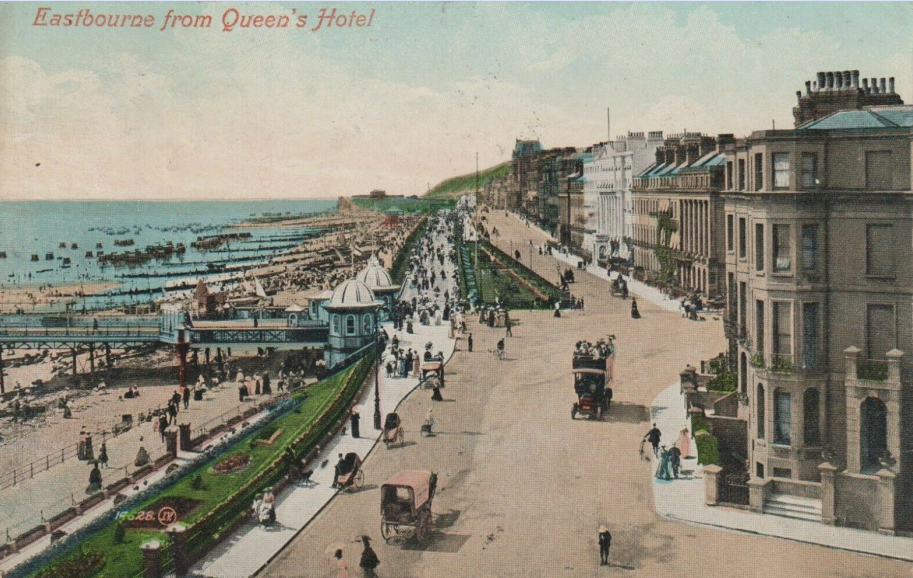
Eastbourne, Grand Parade (late 19th c. postcard).
The order of battle.
In the best CSG tradition, the scenario was anything but balanced, even if numbers were almost equal on both sides. Yet as both had attack missions, neither enjoyed a numerical advantage normally assumed to be necessary for attack operations; it remained to be seen whether the contestants would manage to create local numerical superiority by clever concentration of their forces. The French team had at its disposal three battalions (1e, 2e, 3e) of the 71e Régiment d’Infanterie, a battalion Zouaves, a battalion armed sailors, four field guns, two 37mm Hotchkiss guns, two companies Foreign Legion infantry and a troop of cavalry. The British team could send into battle three battalions (1, 2, 3) Victoria Rifle Volunteers, a weak battalion Royal Marine Light Infantry, a few companies armed sailors, several local volunteer units of widely differing characteristics and four weak companies of mounted infantry.
Both sides were provided with briefing packs which included intelligence reports of varying quality and veracity, newspaper clippings and detailed information on the units themselves, their moral and their commanders, including mini-biographies to include immersion.
French and British battle plans.
The French team decided to attack on three axes into the city, with the Zouaves battalion pushing from the South along the coast, the first battalion, 71e Régiment, further to the North attacking eastwards and the second battalion, 71e Régiment attacking towards the town hall. The third battalion, 71e Régiment initially served as an operational reserve, and the battalion of armed sailors initially occupied a holding position to the North West of the train station.
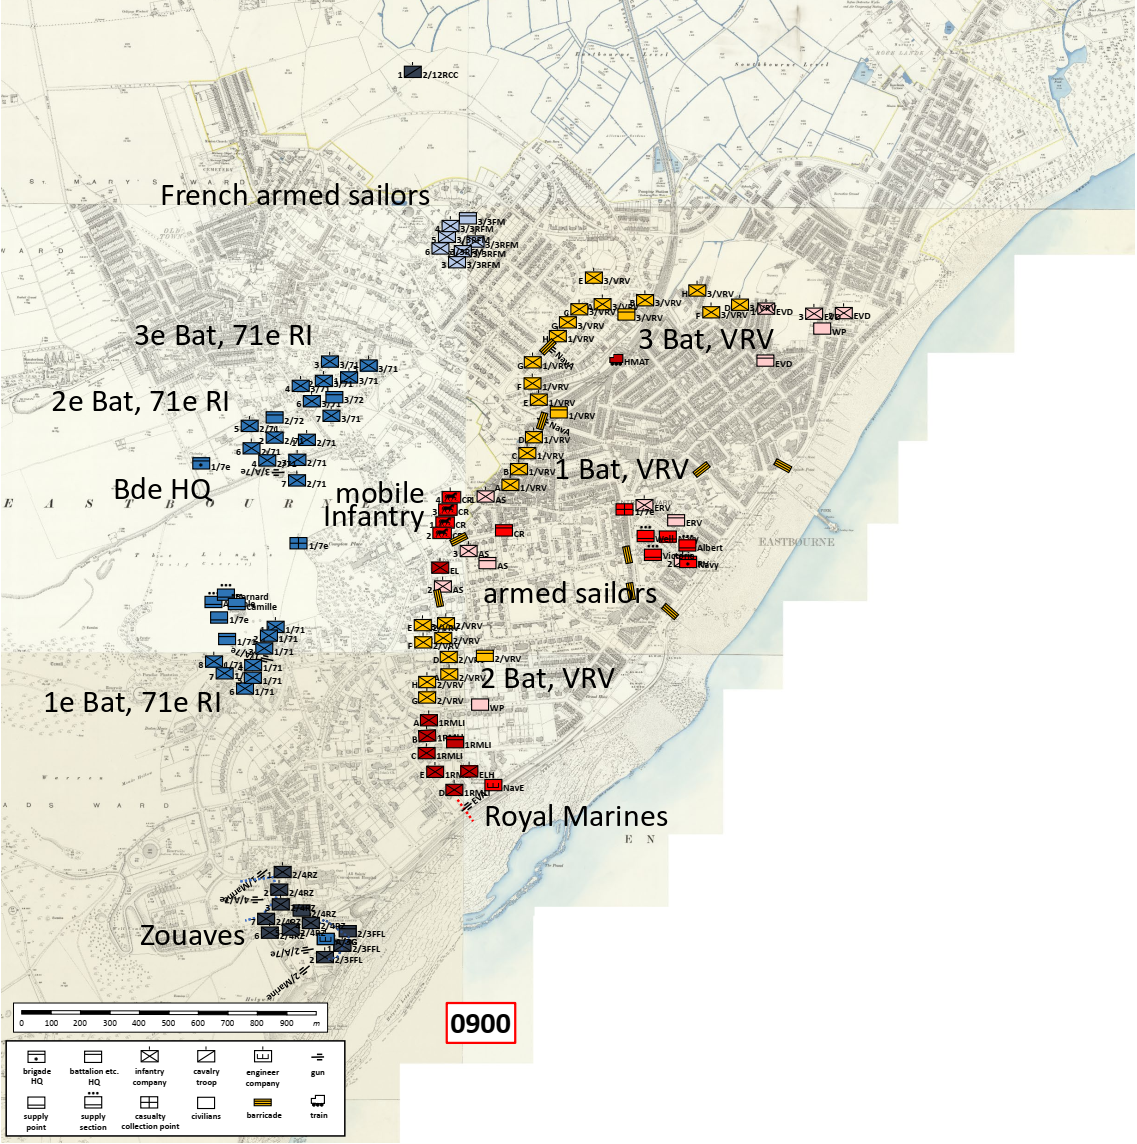
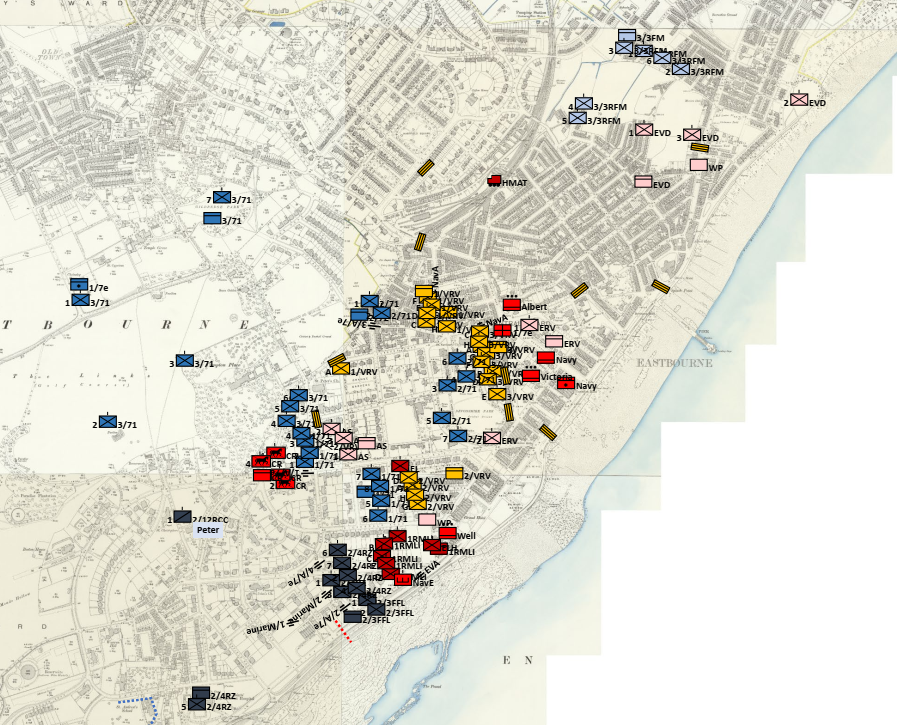
Initial dispositions.
The British team, instead of immediately attacking, decided to wait for the first French blows to fall. Blatantly disregarding conventional military wisdom it did not keep a reserve, stringing out its units all along the perimeter instead. The southernmost part of the perimeter was held by the battalion Royal Marines Light Infantry; to their right was the second battalion, Victoria Rifle Volunteers, followed by three companies of armed sailors. Around the Town Hall and to the North lay the positions of the first battalion, Victoria Rifle Volunteers, while the third battalion, Victoria Rifle Volunteers, held the perimeter to the North of the train station. The northern edge of the perimeter was held by the Eastbourne Volunteer Defenders, while two further volunteer companies covered the British HQ at x. Most importantly, a unit of mounted infantry was positioned between the first battalion, Victoria Rifle Volunters and the armed sailors, and it was tasked with moving westwards in order then to wheel to the South. Eventually, this would prove to be crucial for the outcome of the battle.
Phase 1: Advance to contact.
Around 0900 French forces started to move. Initially, the Zouaves and the first battalion, 71 Régiment d’Infanterie, met little resistance apart from a few snipers. The leading companies of the second battalion, 71 Régiment d’Infanterie, however ran into the mounted infantry pushing westwards. After a brief firefight resulting in little losses to both sides the mounted infantry gave way and drew back into the park around Comptom Place. There, on the Western edge of the park, they overran the French casualty collection point. While the second battalion, 71 Régiment d’Infanterie continued its attack towards the city centre, the mobile infantry became aware of the French supply station positioned near the pavilion in The Links and attacked it; with mounted infantry in their rear the French became aware of a dangerous situation developing, including a threat to their brigade HQ at Cholmeley House.
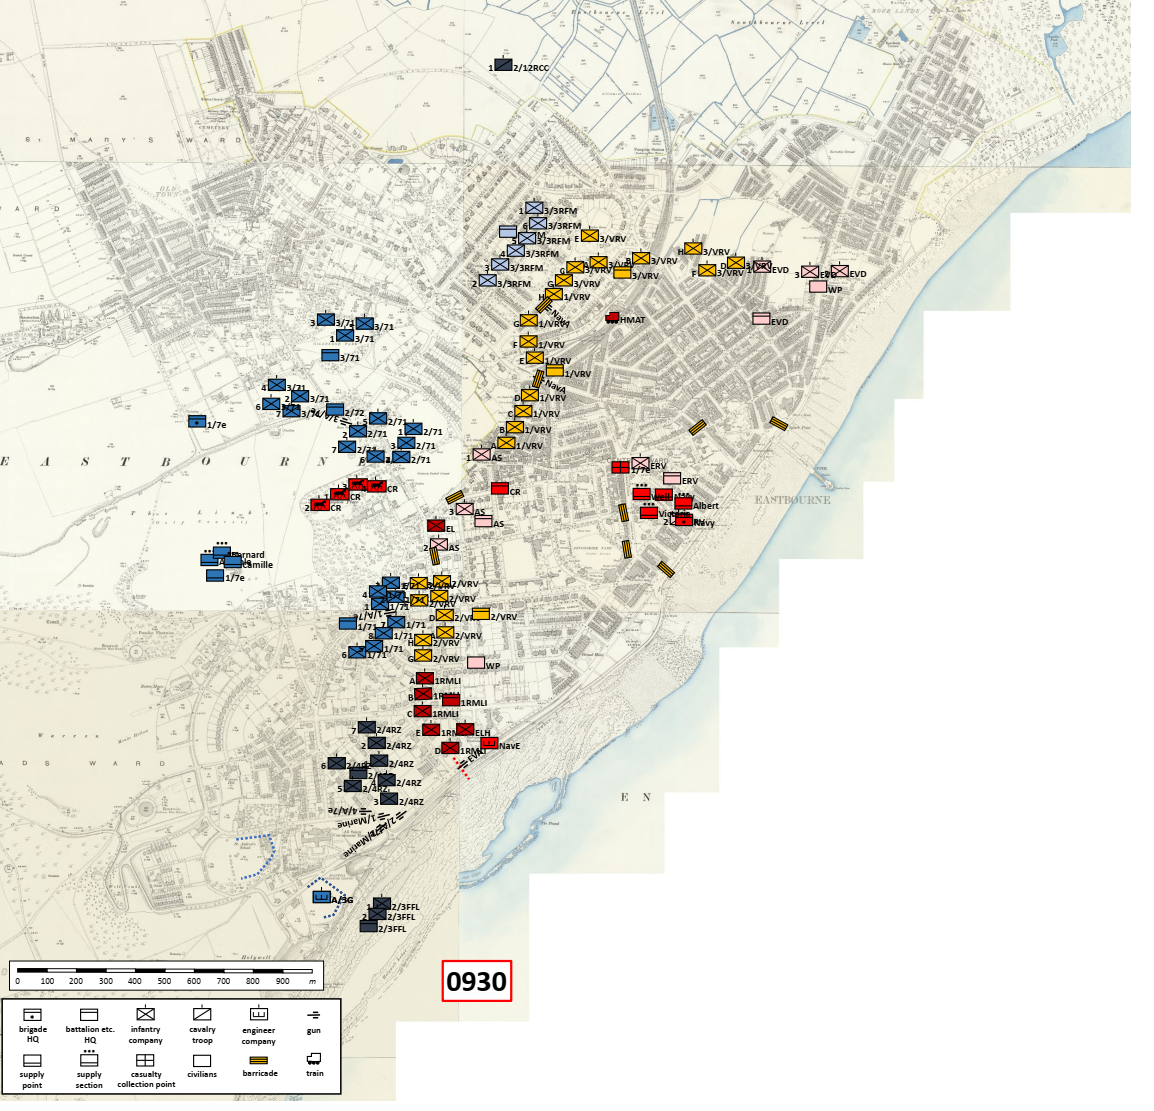
French Attack.
As a result, four companies from third battalion, 71e Régiment d’Infanterie, were sent southwards to cover the HQ and retake the positions of both the casualty collection point and the supply point. Eventually - and in line with their initial orders -, however, the mounted infantry turned South and While one may wonder whether sending soldiers on foot going after cavalrymen , moved to the attacks get going, but before that mounted infantry lashes out, captures field hospital, destroys supply point, moves to the south and entered Meads Ward, the southernmost part of the town.
Phase 2: The Frech break into the British perimeter.
Meanwhile, the Zouaves had made contact with the British line; the five companies of the Royal Marines Light Infantry were holding houses in Bolsover Road West, supported by a field gun firing from a position on Cliff Road. The Zouaves, supported by two field guns and two 37mm Hotchkiss, managed to push the Marines back to the Hydropathic Establishment, but were unable to press on, at least for the time being. To the North, the second Battalion, Victoria Rifle Volunteers held houses in Granville Road West, North and South of Carlisle Road. Here, the first battalion, 71 Régiment d’Infanterie, attacked with spectacular success. Four companies of second battalion, Victoria Rifle Volunteers, were totally destroyed North of Carlisle Road, while the remaining four companies holding positons South of Carlisle Road were pushed back into houses in Granville Road East, suffering heavy losses in the process.
Thus, north of Carlise Road, first battalion, 71 Régiment d’Infanterie, had punched a hole into the British line, with immediate consequence. For although the French companies were too exhausted to press further into the city, the British decided to pull the armed sailors downwards towards Granville Road and have them form a defensive line along Grassington Road; the sailors had originally been positioned between St Peter’s Church and Town Hall and in the way of the developing attack of second battalion, 71 Régiment d’Infanterie. Thus, when second battalion, 71 Régiment d’Infanterie, reached Town Hall, they found little resistance; the area was held by just one company from second battalion, Victoria Rifle Volunteers, which was quickly destroyed. Further to the North, French armed sailors had pushed carefully towards the train station, but ran into resistance around Hartfield Square. Here, British Forces were supported by an armoured train, and after spending some time in positions on the North end of Hartfield Square the armed sailors were pulled back as the armoured train continued to bombard their positions. British reaction to the crisis developing on their southern flank was to pull back first and third battalion, Victoria Rifle Volunteers, to a new perimeter around Central Ward.
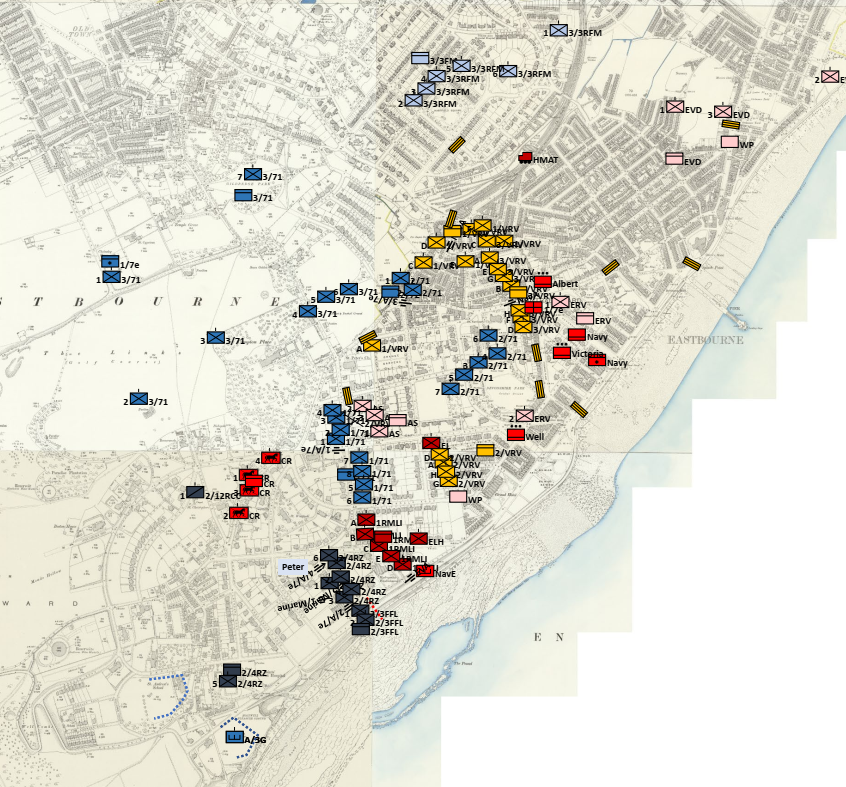
The French push into the city.
The tide of battle now seemed to turn decisively against the British. Although the Marines offered stubborn resistance and kept the Zouaves from taking the Hydropathic Establishment for a wile, th first battalion, 71 Régiment d’Infanterie, managed to push the remaining four companies of second battalion, Victoria Rifle Volunteers, towards Grange Road. At the same time the second battalion, 71 Régiment d’Infanterie, met little resistance and moved further into the city, occupying positions on the Northern end of Devonshire Park and pushing two companies on the Western edge of Devonshire Park down to Skating Rink, from which they could already see the beach. A counterattack by third battalion, Victoria Rifle Volunteers, on French positions around Devonshire Park then failed badly, the Volunteers losing half their men in the process, with little French losses. In the North, French armed sailors started to move eastwards, crossing the railway line and pushing towards the nursery and the Ordnance Yard. Although they met some resistance which kept two companies pinned down in houses in Melbourne Road, the sailors slowly made their way east- and then southwards, with Albion Hotel and Queen’s Hotel their objectives.
Phase 3: The tide turns.
However, while the French were making headway in the centre and in the North, there were ominous developments behind the first battalion, 71 Régiment d’Infanterie. A rather heavy-handed kintoc response to the civilian population in Meads Ward had the local population rallying around a retired RN captain who then set about to lay siege to the Zouaves HQ which was located in All Saint’s Convalescent Hospital. At the same time the French Brigade CO, who had decided to leave his command post to get a better picture of how the attack of the Zouaves developed, experienced first hand that the situation to the rear of the Zouaves was out of control; he had to spend some time hiding in St John’s church before being rescued by a small party of cavalrymen.
The British attack.
Even more significantly, the mounted infantry, which had taken some time moving through Meads Ward and liaising with the local resistance, now appeared in the rear of the first battalion, 71 Régiment d’Infanterie, and attacked the four companies positioned North of Carlisle Road with devastating effect, supported by the armed sailors who emerged from their positions in Grassingon Road. Luck was now on the British side, as they suffered only light losses and could exploit their momentum by continuing their attack on the remaining companies of the first battalion, 71 Régiment d’Infanterie, with similar success.
Phas 4: British success.
Heavy fighting now erupted around buildings to the North East of the Hydropathic Establishment, where the Zouaves tried to push through British lines with considerable determination. Their initial attack, however, failed, and was followed by an equally determined British counterattack by the Royal Marines; trying to stave off the British attack the Zouaves were then taken in the flank by the British mounted infantry and armed sailors, buoyed by their success against the first battalion, 71 Régiment d’Infanterie. The British attack met fierce resistance, and the attackers lost about a third of their strength, but in the end the Zouaves broke and the battalion was destroyed. Only two companies French Foreign Legion infantry managed to retreat in good order into the direction of All Saint’s Convalescent Hospital.
In the meantime, the armed sailors had managed to push southwards on Royal Parade and started to occupy Albion and Queen’s Hotel. With the pier only 250m away, shots started to ring out, and the torpedo boats moored beside the pier were hits. The French were close to finally fulfilling their primary mission - deying the enemy the use of the pier - when 3 battalion, Victoria Rifle Volunteers, which the British had frantically moved around and sent towards Queen’s Hotel, attacked, supported by two companies of Eastbourne volunteers. Outnumbered, the French had to pull back, trying to consolidate themselves around Albion Hotel, but with the Australians preparing for another attack.
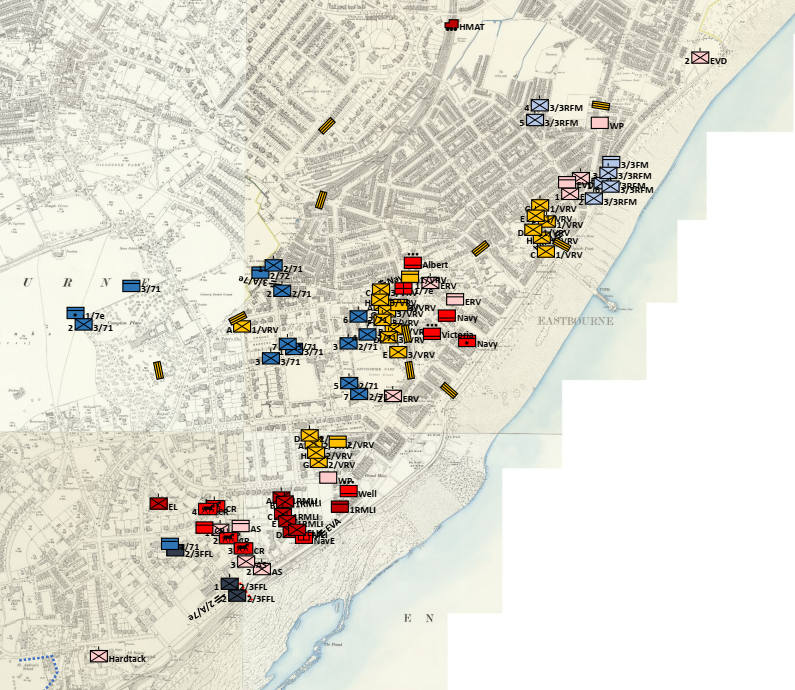
The overall situation at the end of the battle.
At that point, with all attacks failed or stalled and less than half of the initial French force surviving (around 1600 out of an original 3800), the facilitators decided to call it a day. As the French had the objective to prevent the Royal Navy from launching torpdo boat attacks against supply ships in the Channel, and failed to do so by not capturing the city and not securing the artillery positions in Holywell Pleasure Gardens and St Andrews School, the facilitators decided on a British win, even though the latter failed to take Upperton.
Final notes.
From the facilitators’ point of view, the Kriegsspiel was a success. It is always a good sign when participants create a workload for the facilitators that is barely manageable, and due to the constant action and the participiants’ attempts to react to events, there was a lot to do! Also, the course of the battle was quite interesting, first favouring the French before fairly late into the battle swinging decisively to the British. In both cases the participants, even when staring defeat in the face, never shied away from making decisions and trying to get back on track, which from a facilitator’s point of view was quite impressive to watch. Apart from a few minor glitches, running the Kriegsspiel online worked well, too, with the numbers of the facilitators involved probably being the most important improvement for future Kriegsspiele: with a scenario of this size, five to six instead of four facilitators are adviseable.